QUICK START
- Put the Floatron in the pool.
- Maintain normal chlorine/salt levels (1.0-1.5 ppm) for 3-4 weeks. This lets the Floatron build up its minerals.
- After 3 weeks test the pH and adjust if necessary (7.2-7.8)
- Remove & scrub the electrode with wire brush once a week.
When the mineral ions have built up to a sufficient level (0.2 – 0.3) OR after 3-4 weeks, start to reduce chlorine levels gradually to 0.2-0.4 ppm, and let the Floatron take over.
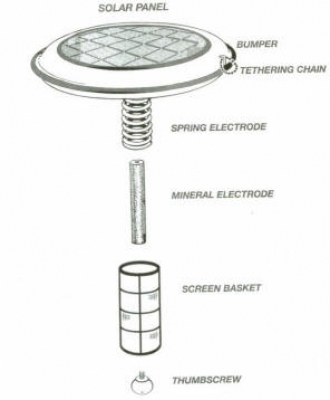
INITIAL ASSEMBLY
 You are now one step closer to owning a hassle-free pool and reducing chemicals. Congratulations!
STEP ONE
Lay the unit face down on a smooth surface and hold the spring electrode down in a compressed condition
STEP TWO
Thread the end of the mineral electrode clockwise onto the silver metal screw stud at the base of the unit and tighten by hand. A bit of vaseline on the thread keeps it free
STEP THREE
Place screen cage over electrodes and screw plastic screw into the electrode. Unscrew weekly for cleaning. Remove electrode from unit to clean.
*DO NOT over tighten the blue plastic thumbscrew. It will snap if force is applied.
NOTES
The spring electrode is permanently installed and is not removable. DO NOT ATTEMPT TO REMOVE BY TWISTING OR PULLING. Permanent deformation may result. The purpose of the screen cage is to trap any deposits or residues which may form on the electrodes during normal operation. The screen prevents any particles from falling into the water. The cage also spaces the electrode from the spring. If they touch they Floatron won’t work as no current will flow, and minerals will not be produced.
STARTING UP
The FLOATRON will help protect your pool against microorganism invasion. Its solar ionization process helps transform your water into biologically healthy and algae resistant mineral water. Depending on the volume of water, weather conditions, and usage, the initialization period will range from about a week to several weeks.
The Floatron cannot ionize a pool instantly because it is designed as a trickle charger with a safe and effective low power output. Therefore, it is important to maintain normal chlorine/salt levels during this start-up period to let the Floatron build up its mineral ions.
STEP ONE
Begin with normally chlorinated water, and normal pH for your pool. Use your regular chlorine test kit to maintain approximately 1.0 PPM (Parts Per Million) chlorine residual. More chlorine may be necessary if conditions warrant. Clear the water prior to floating your Floatron. If your water is less than clear, it may require a ‘shock’ dose of oxidizer / chlorine.
STEP TWO
Free float while ensuring direct sunlight on the unit. If necessary, tether in a sunny part of the pool any suitable restraint may be tied to the tethering chain for this purpose. Operate pump and filter system during daylight hours when your Floatron is generating ions. This will allow proper mixing and circulation of the minerals. Pump operation is unnecessary and optional at night, and the unit can be left in the pool overnight.
ION TESTING & POOL SIZE
The mineral electrode is made of a unique alloy of several specific metals, predominantly copper. Included with your kit is a Free ion test kit which can help detect the presence of copper ions in the pool, thereby enabling you to determine if the water has an adequate level of protective minerals. Some filter media can inhibit accurate readings, which is why we recommend a computer water analysis for more accurate ion readings.
The target is to have the Floatron in the pool for 3-4 weeks, or until a 0.2 PPM ion reading is reached (whichever happens first). After this, chlorine reduction may begin. If the ion reading climbs to .5 PPM or more, remove the unit from the water for a week and monitor ion level (weekly).
The purpose of ion testing is to initially determine that it is safe to reduce chlorine, and subsequently to establish a floating schedule which results in a steady ion reading of approximately 0.2-0.3 PPM.
For pools over 60,000 litres, NZ conditions are generally not hot enough for pools to over-ionise. Therefore testing can be virtually eliminated. Pools under this size can float week in, week out, or for very small pools – under 30,000 litres we recommend floating 1 week each month (again we recommend a computer water test for more accurate readings). For smaller pools, monitor the ion levels. You will soon determine how long to float your unit. For example, one day in, one day out, two days in, one day out, one week in, one week out, etc. Pools with screened enclosures will probably require full time floating as the output will be about half of that with normal full sun.
The reagents in the ion test kit provided free with the Floatron are very sensitive, & readings can be affected by various interferences. Accordingly, use the ion test as a basic and general indicator. We suggest a water computer analysis or other test kit for more definite readings.
THE FIRST FEW WEEKS
During this period you may witness the ion level build up to approximately 0.2 PPM. Remember, more ions are not better. The water has a capacity to hold only a certain amount of minerals, and attempting to exceed what is known as ‘saturation point’ may result in minerals collecting on pool surfaces.
It is important to spend a few minutes a week to check the ion level and to keep the electrodes clean (see ‘Electrode Cleaning’).
Upon reaching the recommended ion level of .3 PPM, or after 3-4 weeks if no ion reading shows, initiate chlorine reduction by allowing the chlorine concentration to drop to about half of its normal level, or approximately .5 PPM.
The pH range may now be expanded from 7.2 – 7.8. The Floatron works well at higher pH values, so do not arbitrarily attempt to adjust the pH if it is within this recommended range.
Keep in mind that the general idea is to use your Floatron just enough to maintain an adequate ion level, and to determine how little chlorine is necessary to keep the water clear. Allow the water to settle down and seek its own balanced condition.
NOTE: NZ conditions are generally not hot enough for the mineral ions to build up above 0.5ppm in pools over 60,000 litres. Smaller pools may need to remove the Floatron more frequently.
ELECTRODE CLEANING
The electrode MUST be removed completely from the Floatron on a regular basis to stop it fusing to the unit itself. Never leave the electrode in a Floatron which is out of water.
Clean electrodes weekly in summer and monthly in winter.
The Floatron is the only purifier which, in addition to generating beneficial mineral ions, collects undesirable minerals such as calcium and iron. This has the effect of softening your water.
The sacrificial mineral electrode is designed to slowly erode away, and in the process will form a scale buildup, which will require occasional cleaning. The spring electrode may also form a scale, which normally consists of calcium, and should also be cleaned.
The initial rate of build-up will be quicker in harder water, and will slow as the water becomes progressively softened.
Heavily scaled electrodes will restrict electrical flow and slow the ionization process, therefore it is advantageous to clean them on a weekly basis:
- Lay unit face down, preferably on grass.
- Remove thumbscrew, & screen.
- Unscrew and remove electrode entirely from Floatron unit
- Blast with a jet of water from garden hose nozzle, to knock off loose material and scale.
- Use the wire brush to remove the remainder of the build-up (you do NOT need to clean back to bare metal)
- Re-install the electrode AND/OR With water running over the electrodes, slide the spring up and down, while making contact with the centre electrode from various directions. The residues will wash away with the water.
The centre electrode needs only a quick scrub to remove loose debris, and the spring is relatively easy to clean completely. If the majority of the scale is removed, the will perform satisfactorily. It is not possible to clean the electrodes too much or too often. The cleaner the electrodes, the more efficient the operation. Occasionally, the screen will require cleaning to ensure a free flow of water and ion exchange. Because the mesh is very fine, deposits can slowly choke the openings in the screen and restrict water flow. To clean the white mesh screen: Hose out loose debris.
a) Immerse screen in a jar of white vinegar until visually free of blue / white scale build-up, use an old toothbrush to remove scale.
OR
b) Mix about 1/3 hydrochloric acid to 2/3 water and place screen into a jar containing this mixture. The cleaning process will take a minute or less. Do not expose screen to the acid mix for more than a minute or so as it could soften the plastic.
Rinse screen and reinstall.
ROUTINE
You will get to know how the Floatron performs in your own pool within the first few months.
Initially you should spend a few minutes each week to monitor the water balance, clean the unit, and to learn the trends. After this time you will know how little chlorine is required, and how much floating time does the job etc.
Higher chlorine levels may be required with an increase in water temperature, increased swimmer load, rainfall, or new water added. If using liquid chlorine, add at or after sundown because the sun’s rays quickly neutralize chlorine. The recommended levels are not absolute and may vary with changing water conditions. Please adjust accordingly.
What works best for your pool is determined by experience. Allow your water to seek its own balance. Do not arbitrarily alter the pH, apply large doses of chlorine (AKA ‘Shock’), add algaecide, add conditioner, or try to change perfectly clear water. Give your pool water time to stabilize, and remember, SIMPLICITY IS THE KEY.
ELECTRODE REPLACEMENT
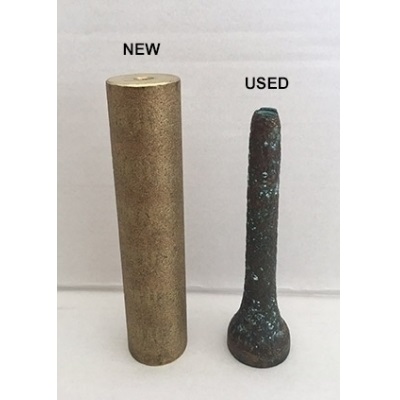 The mineral electrode is sacrificial and designed to slowly disintegrate. After an average of 12 months, depending on conditions, the electrode will wear away and require replacement. You will know this when it is ‘pencil thin’, or about 1/4 inch at the centre.
If you cannot secure the cage on with the plastic screw, you can cut a thin piece of plastic (i.e an old ice-cream container lid), and slide that between the cage and the Floatron. Or use a mesh stocking or similar fabric around the spring to catch the debris that falls off. This way you should be able to get more use out of the electrode.
To change the used electrode:
Remove screen, and clean parts. Compress spring, rotate centre electrode anti-clockwise.
If necessary, use pliers for leverage. Continue to unthread until free
CLOSING / REOPENING
We recommend leaving the Floatron in the pool all year round. This saves having to ‘start-up’ again (i.e. shock dose) once summer begins. Simply reduce filtering hours, and chlorine. Electrode cleaning should be carried out every 3-4 weeks.
If you do decide to close your pool down for winter follow these instructions:
Ensure ion reading .3 to .5 PPM. The mineralized water will protect against algae; the ions act as an algaecide, therefore no need to add additional algaecide.
Turn off all equipment, including pumps, chlorinators, etc. If the water is clear, no need to oxidize. If less than clear, add chlorine / oxidizer.
Remove Drain water, winterize pumps, cover, etc. as desired.
Clean and remove electrode from the unit and store in an airtight plastic bag or jar.
Store your Floatron indoors.
If the pool was shut down with an insufficient ion level, or severe conditions were encountered late in the off season, less than clear water conditions may be experienced.
Upon opening:
Top off water level, backwash, and vacuum as necessary. Add chlorine to clear any cloudiness, if present. Test ion level. Float unit to re-establish .3 PPM.
If ion level is below .3 PPM, temporarily increase chlorine for protection. Maintain enough chlorine to ensure water clarity.
Verify pH is within 7.2 – 7.8 Range. Correct if necessary.
ANNUAL WATER TESTING
We recommend getting all levels tested at least once a year including pH, alkalinity, Hardness, TDS etc
OPERATIONAL CHECK
It is highly unlikely that your Floatron will not generate ions. However, should there be any doubt, the following quick check will visually prove electrical generation:
- Fill a clear, glass or plastic jar with pool or tap water.
- Clean electrodes and leave screen off.
- Place the Floatron on the top of the jar, resting on the lip, with the electrodes immersed in the water.
Spring and electrode MUST NOT touch each other. - With full sun shining on the solar panel, very fine bubbles will be observed originating from the spring coils. This demonstrates that electrical current is being generated.
Absence of bubbles indicates a problem. Contact Floatron NZ for advice.
TIPS
It is advisable to get all levels tested annually and adjusted if necessary
Allow new plaster type finishes to cure for a month prior to using the Floatron. Baking soda or pH increase works well to raise pH, and is readily available and reasonably priced.
Household bleach works excellently for small sized pools. For large pools, too many litres may be required, making more concentrated forms of chlorine more convenient.
Keep a tablet of chlorine in the skimmer, or floating dispenser, to provide a constant input of oxidizer into the pool. When necessary, add an additional boost of liquid or granulated chlorine to maintain clear water.
A toothbrush helps in electrode and screen cleaning.
A cut-off golf tee or wooden dowel can be used to secure the screen if the thumbscrew is lost. A stocking or other mesh can be used around the spring to catch any debris.
Store chlorine in a cool and dark place.
Keep ion test kit in refrigerator.
Check water hardness, measured as total dissolved solids (TDS) at your local pool store. Readings of approximately 2000 PPM or greater indicate the need to drain and refill with refresh water. If that is not possible, partial draining and refilling is beneficial. With a high TDS, the water cannot absorb and retain minerals very easily.
The addition of cyanuric acid (stabilizer) is not necessary if you already use a stabilized form of chlorine, such as tablets.
The Floatron works well with a pool cover. The choices are to open the cover enough to float the unit, or cut a 3 inch “X” into the cover which allows the electrodes to remain in the water while the top is exposed to the sun.
Clear, high quality water without algae, and an abnormally low ion reading, does not necessarily indicate that your Floatron is not functioning properly, in this situation, call Floatron NZ.
When replacing the mineral electrode, ensure that the threads are dry and free of water.
In hard water conditions, over time, the solar panel may form calcium deposits which are left by water evaporation. To quickly and easily remove the scale, apply diluted acid / water (as described under ‘Electrode Cleaning’) with a toothbrush. Allow to dissolve deposits and rinse. Other cleaners i.e. ‘Jif’, ’spray and wipe’ or vinegar may be used.
DO’S AND DONT’S
DO NOT automatically take advice for granted from those who are not experienced with the FLOATRON. This type of expert opinion is often influenced by the desire to sell or use chlorine and related pool chemicals. Additionally, recommendations more often than not reflect a chlorine based pool chemistry, and are not applicable to ionized water.
DO NOT add any floc, clarifiers or metal removers which will eliminate the beneficial mineral ions generated by your Floatron.
DO NOT use with baquacil or soft swim brand products, or others with similar chemistry. These chemicals must be removed from the water first.
DO NOT leave the electrode in the unit if it is out of the water. This can cause it to fuse to the unit and may be impossible to remove.
SPA POOL – COVERED/INDOOR POOLS
For permanently covered pools/spas you can still use the Floatron without having it floating in the water.
Sit the Floatron in a bucket of water in the sunlight. This will create a concentration of minerals in the bucket which you can then use in the pool. After its ionised, tip this water in to your spa/pool. Depending on the volume of water you may need to float it every day (over 50,000 litres), or one day per week (under 5,000 litres). You only need add the concentrate once a week.
Use a copper ion test kit to measure the mineral ions in your pool/spa AFTER you have added the ionised bucket. Initially you will need to use more to get the minerals up to ideal level (see the FIRST FEW WEEKS).
Remember you must REMOVE THE ELECTRODE when it’s not in water – or cover the solar panel and leave it in water
GENERAL POOL CARE INSTRUCTIONS
- Summer filtering should be approx. 10 – 12 hours daily
- Winter filtering should be approximately 2 hours daily
- Backwash, then rinse your filter every couple of weeks or more often if you have done a major clean up. Rinse after backwashing. Then back to filter.
- Use a test kit to monitor chlorine and pH levels
- With a Floatron your chlorine/salt levels should be 0.2 – 0.4 ppm
- Without a Floatron your chlorine/salt levels should be 1.5 – 3.0 ppm
- pH should remain between 7.2 – 7.8 and other levels such as calcium hardness should be as normal
- Chlorine tablets (stabilised tri-chlor) are convenient and can be put into the skimmer basket or a floating chlorine dispenser, otherwise add granules or liquid once a week.
- It’s recommended to get all your levels right at the beginning of the season. A water analysis at a local pool store will test things including calcium hardness, TDS, pH & alkalinity.
- If filter is sluggish it may require cleaning of the sand. See a pump specialist
- Remember to remove and scrub the electrode once a week, and remove the electrode from the Floatron if it’s out of the water for more than a few days.
For pools needing a major clean-up:
- Use algaecide to kill off any algae
- Shock dose with chlorine.
- Leave filter running at least 48 hours, then shock dose again if needed.
- Brush sides and vacuum to waste to remove the bulk of the debris.
- Backwash filter and keep skimmer basket clean and clear of leaves
- Top up pool with fresh water and keep chlorine levels up to stop algae growth
- Drop chlorine levels (for pools with a Floatron) after 3 weeks (summer use).
- Test and adjust pH after 3 weeks.
ZODIAC / VACUUM INFORMATION
If your Baracuda suction cleaner is moving sporadically, stopping & starting, or is sluggish check the following:
- Does the diaphragm have any splits, rips or tears in it (needs replacing)
- Adjust the weir valve (in the skimmer) with either the 1,2,3 setting or adjust the dial setting
- Remove the hose and re-join it in different places to avoid it getting a memory
- Make sure your filter is regularly backwashed and rinsed.
- Ensure there are no splits in the skimmer plate where the weir valve plugs in (this will cause loss of suction)
- Summer to winter temp change may require weir valve setting to be changed